Today, we are going to learn how to get a great template for our new site for as cheap as possible. But more importantly, we are going to learn how to create something awesome!
Now the clock is ticking and the truth of the matter is that we have this one shot at this magical, amazing thing called life! Let’s not mess around with that opportunity and step lightly… Our goal is to step into the arena firing on all cylinders with a website that is ready to stand toe-to-toe with the greats!
By this point, everything should be starting to fall into place. You should have enough real world experience from buying your domain name and building your logo to begin to see that this whole process is actually a lot easier than most people think.
When I first started this whole thing, the first couple of builds were pretty sketchy and I had a lot of anxiety and self-doubt about the whole process. But then after about the 3rd project, everything just seemed to click and fall into place.
Related: The 7 Biggest Mistakes When Starting a Business
It’s important to push through these first couple of projects because at the end of this process is the realization that you can use these skills to build any kind of online website or product in the world.
QUICK NAVIGATION
1. INTRODUCTION TO OUTSOURCING
2. BUSINESS IDEA GENERATION
3. FINDING AND BUYING A GOOD .COM DOMAIN
4. LOGO DESIGN AND BRANDING
5. WEBSITE TEMPLATE SELECTION AND CUSTOMIZATION
6. SERVER SETUP AND HOSTING
7. CODING AND PROJECT WRAP UP
WEBSITE TEMPLATE SELECTION AND CUSTOMIZATION
Our objective for this next section is to find an awesome template for our new site for around $30 to $50 dollars. What we are going to do is find a template that is basically already built and then we are going to customize it to suit our purposes.
The best place that I would recommend finding great templates for cheap is at ThemeForest. This website is basically your one stop shop for all kinds of great pre-built templates in various different formats. If this is your first website I would recommend building your site in WordPress.
What is WordPress?
Okay, good question; WordPress is a CMS (Content Management System). Its purpose is to basically provide an interface for the user to manage they’re website or blog. WordPress is arguably the easiest CMS on the face of the planet and will allow noobies to tweak and add content to their site without the need of a coder.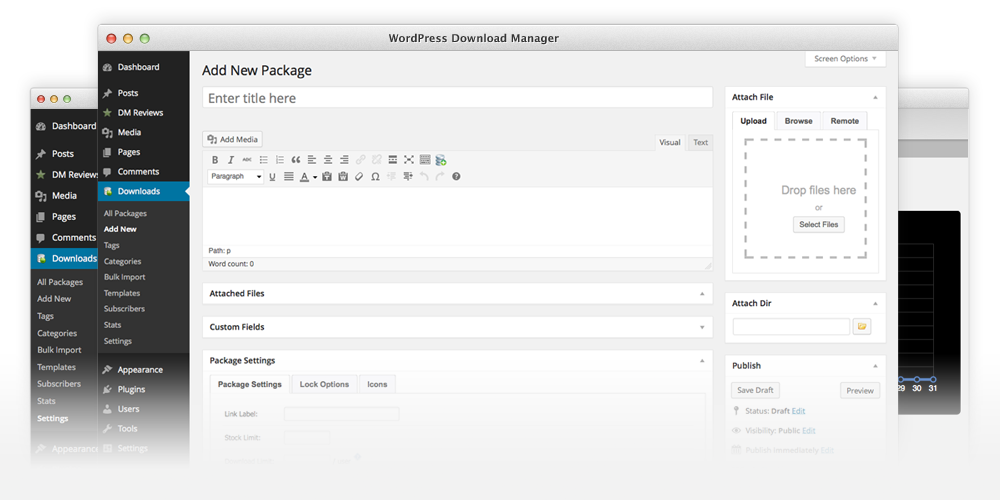
One of the alternatives to WordPress would be if you just used straight HTML code. This method would not include any kind of interface and all changes to the website would have to be done with actual coding.
Related: Launching 5 Million Dollar Businesses In 1 Year – A Project Overview
Most of my websites are in WordPress www.alphamaleblueprint.com and all 3 of the Viralnova style sites. This is for good reason because I don’t know how to code! Yup, that’s right, I’m building 5 startups this year and I don’t know how to write a single line of code (and neither will you!).
Most people take a look at starting a career online and will immediately think that they need to learn all of these coding skills to even be able to step into the arena. This is simply not true and in my opinion a total waste of time. I tried learning code, IT SUCKED! I hated it so much and unless you are one of those rare people that just love’s coding, I guarantee you will hate it too. Don’t put yourself through it bro, let the coders code, let the designers design and instead get used to being the quarterback, the shot caller that simply puts the pieces of the puzzle together.
So now that we have established that our first build should be in WordPress, let’s head back over to Themeforest.
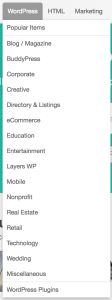 There are basically two ways to navigate this search in order to find a theme. First, we have a dropdown menu at the top of the screen specifically for WordPress. In here you will find a variety of categories to choose from. Select the category that fits your project and you will see a bunch of results.
The second method, which is my personal preference, is to search by keyword. In order to do this, we want to click on the actual WordPress category which will forward us to a screen where we can perform our search within only the WordPress category. This allows us to only see WordPress results. Alternatively, you can just use the search bar on the homepage and then narrow the results to just WordPress by using the search result filter options on the left-hand side of the screen.
You can hover over the search results and see a quick preview of each of the themes. You can also click on a theme that looks appealing and be provided with additional information as well as a preview link which will allow you to actually visit a demo of the theme live in action.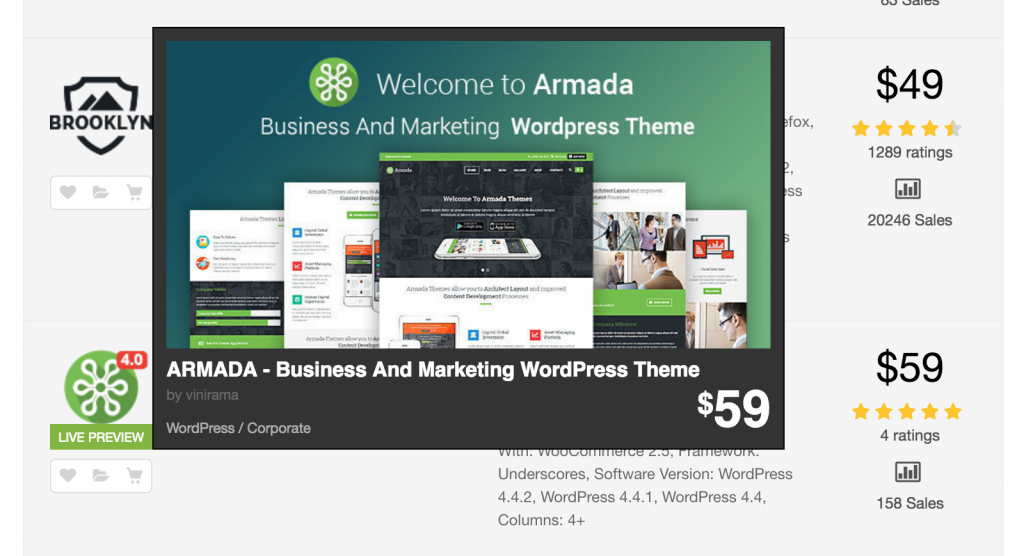
It’s important to note the search filters at the top of your results as these can be used to sort your results in a variety of different helpful ways. Are you looking for the newest theme? Maybe you want to go with what is most popular? Are you on a budget and looking for the cheapest? Use your filters to help you find what you’re looking for.
The reality is that I tend to use a combination of both of these methods and I’ll admit that it sometimes takes me hours or even days to pull the trigger on selecting a theme. I think this is normal…
Related: How To Build Your First Website For Less Than $200 – Introduction To Outsourcing
An important thing to keep in mind is that any part of the theme can be removed or changed to accommodate anything that you want. All of the colors, fonts, sections, amount of pages, categories etc is all customizable and able to be modified to suit your needs. Don’t like the header and you want to use the header of another theme? No problem! Just let your coder know with clear instructions and examples and you should be good to go. Focus on finding the layout that you like and don’t be mesmerized or swayed by the pictures or colors used in the theme examples, these will all be replaced with your branding anyway.
There are some AMAZING themes out there and we are going to use that to our advantage. Once we customize the theme with our logo, branding and sales copy we will literally be able to step into the online world with our first creation looking like a million dollar company. That is the true power and lesson of this entire process. Somewhere along the way something is going to click in your head and you are going to realize “Holy crap! I can build awesome online things now”.
But that will only happen if you actually take action and go through the process. For those of you that have not even bought a domain name yet.. What are you waiting for bro?
So once we select and purchase our theme we will be given access to the downloadable files. Make sure to grab those and stick them in a folder, we will want to hand those over to the coder in the next part of this guide.
**Alpha Pro Tip**
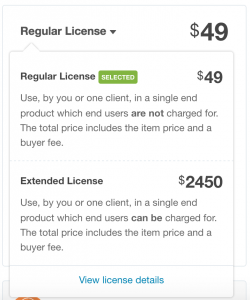
When selecting your theme license you are given 2 options to select from, regular and extended. The regular license is much less expensive and grants you the ability to use the theme in one final product. The extended license allows you the right to actually resell the theme to others. So, if I wanted to start my own “themeforest style” website and resell this theme, for example, I would require the extended license.
Now that you have your theme purchased and downloaded it is time to begin customizations. We are not actually going to do the customizations ourselves this time around. Instead, we are going to create some awesome instructions for our coder to follow.
Related: How To Build Your First Website For Less Than $200 – Logo Design And Branding
In order to do that we are going to use 2 tools, the first one is a plugin for Google Chrome called Capture, Explain And Send Screenshots. This plugin will allow you to grab a screenshot of the demo version of the theme that you purchased and it will allow you to write notes and draw arrows on that screenshot. There are several other tools out there that perform this same function as well such as Nimbus and Awesome Screenshot, use whichever one you prefer as they all basically operate the same. This tool is used to create a visual set of instructions for your coder to easily follow. Here is an example of how I use Capture, Explain And Send Screenshots.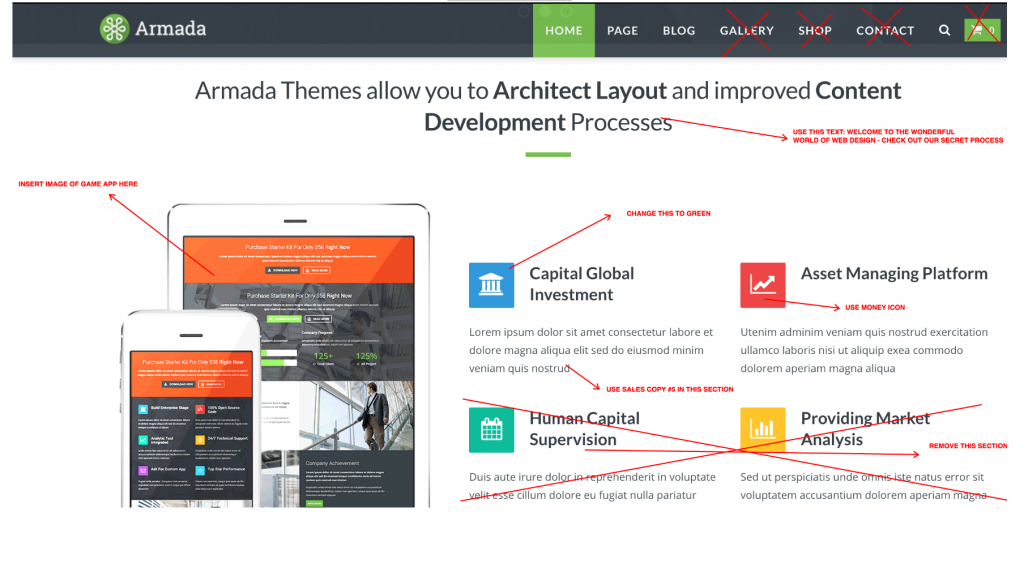
Now another tool that is really powerful and helps to eliminate any kind of confusion is Jing from TechSmith. This tool allows you to capture up to 5 minutes of audio and video from your live desktop. When you are finished recording the video, it is uploaded online and you are provided with a link that can be shared with your coder who can watch the video online without having to download anything. This tool is great for providing super clear instructions where you have the ability to actually walk your coder through the process in your own words while navigating the page and providing commentary. Additionally, the outsourcer will be able to always watch the video as many times as needed if they happen to get stuck on something.
Using both of these tools will allow you to provide some very clear instructions and will increase your chances of having a successful, stress-free build. Always keep in mind that the more information you are able to provide the less of a chance you will run into some kind of costly and frustrating miscommunication along the way.
The final part of the customization process is going to actually involve creating the sales copy. Now I am not going to pretend that I am a great author or an accomplished copywriter, the truth of the matter is that I am an above average writer with a strong marketing background. Our duty as entrepreneurs is to continually search out new techniques and put them to the test. What tends to happen is that you will find yourself taking bits and pieces of overall strategies from various sources and creating your own personal technique that works for you.
There are many great writers, bloggers and mentors out there that can provide you with some great writing tips and guides. Here are a few of my favorite people to gather ideas from.
– Darren Rowse, the worlds most successful blogger PROBLOGGER
– Brian Clark over at COPYBLOGGER
– Derek Halpern, founder of Social Triggers
– Gary Vaynerchuck, media icon www.garyvaynerchuk.com
– Kate Toon, one of the top female copywriters out there www.katetoon.com
There are many other great sources of information on copywriting and I certainly have left out some of the greats. This list is simply a starting point and some of my personal sources of inspiration.
Another solution is to use Fiverr to find a copywriter and have an outsourcer create your website content for you. Depending on your situation and skill set, this may be your best solution especially, if for example, you are creating an English website and English is not your first language.
Related: How To Build Your First Website For Less Than $200 – Business Idea Generation
With that being said I do recommend that you at least try to write your own sales copy for your first website. It is very valuable and important to actually go through the process yourself so that you develop an intimate knowledge of every aspect of the task. Besides, this is a great opportunity to push yourself outside of your comfort zone and add another tool to your “entrepreneurial belt”. Who knows, maybe you might have a hidden talent that can only be exposed by actually jumping in and getting your hands dirty.
Human beings tend to react most to fear, greed and pain. One of the most effective strategies is to identify a person’s pain point and to provide them with the solution to they’re problem. Here are a couple really lame examples.
– Are you paying too much for your taxes? Call now and save hundreds instantly!
– Sick of being overweight? Take these diet pills and lose weight without exercising!
– Tired of being lonely? Join our dating site and hookup tonight!
These techniques should be enough to get you going in the right direction however I will recommend that you conduct additional research. What typically happens is that you will grab little techniques and strategies from various sources until you create your own personal style.
When and if the time comes to actually start running big numbers it is important to cast your ego aside and consider the possibility that you might not be the world’s hottest new copywriter. At this point, it’s time to think about bringing in the big guns and forking over some cash for some killer copy from a seasoned pro.
Don’t get overwhelmed and start worrying about your ad copy or how you are going to sell products. The purpose of this guide is to learn how to build websites. Remember, websites can always be tweaked and ad copy can very easily be changed. We will go deep into conversion optimization and split-testing strategies later on down the road, but for now, let’s put those things on the back burner.
 Once you have all of your ad copy written and your instructions completed, Congrats! You are ready to move onto the next step. If you have made it this far, you can officially let out a sigh of relief, the final 2 steps are super easy.
Check back soon for PART 6: SERVER SETUP AND HOSTING
At this point, you will likely be showing your new skills and creations to friends and family. Don’t worry, those looks of jealousy and words of discouragement coming from those closest to you are something every new entrepreneur experiences. When it happens just smile and take it as a sign that you must be on the right track. Soon, those same people will be asking you for advice, I guarantee it.
Every day take a step towards making your dreams come true. No excuses!


2 comments
Hi, Adam
I have been followed you since I saw you shared the article “The Dos and Don’t of Online Dating” from Men’s Fitness.com
And I love that article, it gives single man the real scenario and analyse the problem and offer valuable solution, such as in out of town and out of touch case where most of single man make the women they date online think they are busy with dating other women
After I read the article, I really want to master my skills of online dating.
Thanks bro, I appreciate you coming along for the journey!